Monday, December 31, 2012

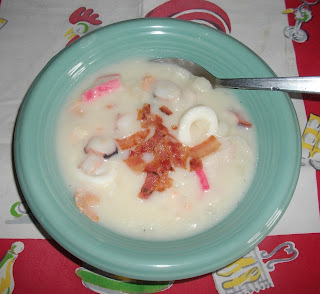
Seafood Chowder


5 strips bacon (I love to use the pre-cooked to save time and mess)
1 medium onion, finely chopped
2 cloves garlic, minced
2 Tablespoons butter
2 Tablespoons white flour
2 cups chicken stock
1 cup dry white wine (Optional – you may replace with milk)
2 cups unpeeled and diced potatoes (Frozen Southern Hash Browns work great and save time)
½  pound whitefish fillets (cod, haddock or fluke)
1 can of baby clams with juice
1 small bag frozen shrimp
1 bag frozen mixed seafood (squid, crab, shrimp mix that I pick up at Wal-Mart)
1 cup heavy cream (You may also use half and half or milk if you want lighter)
Salt and freshly ground black pepper to taste


In a large, heavy Dutch oven, fry up the bacon until crisp. Drain bacon on paper towels and add the butter to the pot. Sauté the onions in the bacon drippings and butter until transparent (about 5 minutes). Add the garlic and cook for one minute. Add flour, stirring constantly for a few minutes, until the roux turns slightly golden (You may also use a corn starch slurry if you prefer, but add it at the end after everything has come to a simmer). Stir in the stock, wine, potatoes and simmer until potatoes are tender.  Stir constantly to keep the soup from burning or sticking to the bottom of the soup pot. Cut the whitefish into chunks and add to the pot. Add your detailed shrimp, can of clams with juice and seafood mix.  Simmer on low for 10 minutes or until the fish is just opaque. Turn heat down to low.  Stir in the cream and salt and pepper to taste. Simmer on low until just heated through, making sure not to let the soup boil (you do not want it to curdle).

Ladle soup into bowls and top with bacon bits.  Serve with oyster crackers or toasted garlic bread.

Variation:  Steam mussels and add to the bowl of soup just before serving.  You may add any seafood you wish even lobster if you wish to go wild.  This is a thick soup and serves beautifully in a bread bowl.  Another option is to add some frozen corn if you like.

Have a safe and happy New Year.   Be happy and may God bless you and yours.  

Sunday, December 30, 2012

Fixin’ White Fish

It has been awhile since I blogged.  I took a little break and focused on a Christmas FB page I was sharing.  I shared a lot of Christmas recipes on it so did not want to duplicate work.  Now that Christmas is over, I'm going to start sharing some recipes I have been gathering lately.  Today I fixed fish for Sunday dinner.


I love fish of all kinds.  I love all seafood and it is so good for you.  I bought some Tilapia and made it in a white sauce today.  I thought I would share two great ways to fix it.  My white sauce is nothing more than  a seasoned béchamel sauce.  

Fish
5 small tilapia fillets  
4 tablespoons extra-virgin olive oil
1 teaspoon salt
1/2 teaspoon black pepper

Brush fillets with olive oil and season with salt and pepper. Grill fish for 4 minutes per side, until golden brown and fish flakes easily with a fork.  If you prefer you may also poach the fish, but I prefer it fried with a little olive oil.  I use my old favorite cast iron skillet.


Tilapia with White Sauce

Béchamel
½ cup dry white wine (If you do not want to use wine, just add same amount in milk)
½ cup half and half
2 tablespoons butter
2 tablespoons corn starch
¼ tsp. salt
1 bay leaf
Pinch of nutmeg 
1 tsp. lemon juice
1 finely chopped shallot or ½ tsp. onion powder
2 tablespoons of fresh parsley
Chopped chives
1 tsp. thyme (I used my dried thyme I dried last fall)

In a small, heavy saucepan, melt 2 tablespoons of butter over low heat.  Add ¼  teaspoon of salt.  Slowly add ½ cup half and half and ½ cup of a dry white wine, stirring constantly.  Add a slurry of 2 tablespoons of corn starch and a little water. Continue cooking slowly until smooth and thickened.

After making the standard Béchamel, add 1 a bay leaf, and pinch of nutmeg.  Add 1 teaspoon of lemon juice, the chopped shallot and 1 tablespoon of chopped parsley and/or chopped chives for more flavor.

Other options:  a pinch of paprika or garlic powder would also be nice.  What is your favorite seasoning with fish?  Flavor it with your favorite seasonings you like with fish. Do not over season it though.  White fish is quite delicate and you'll not be able to taste the fish.

Pull your bay leaf out and add the grilled fish into the white sauce just to keep warm until you serve.   Serve it with rice pilaf or wild rice.


Grilled Tilapia with Garlic, White Wine and Butter Sauce

Sauce
Juice of 2 lemons
1/2 cup dry white wine
1 shallot, minced
1 garlic clove, crushed and finely chopped
1/2 cup unsalted butter, room temperature
1 teaspoon fresh parsley, finely chopped

Juice both lemons and set aside. In a small pot, whisk together lemon juice, wine, shallot and garlic.

Cook over high heat until reduced to half. Remove from heat, cool slightly. When lemon mixture is warm, cut in butter and whisk together. Add parsley and season with salt and pepper.

Cover with plastic wrap and refrigerate for at least 30 minutes. Bring to room temperature before grill them. Heat grill over high heat.

Brush fillets with olive oil and season with salt and pepper. Grill fish for 4 minutes per side, until golden brown and fish flakes easily with a fork.

Place fish on plates and top with lemon butter sauce. Serve immediately over warm pasta.  You can also use sauce with shrimp instead of fish.

Have a great week.  Making a seafood chowder for New Years Eve.

Be happy and may God bless you and yours.


Thursday, November 15, 2012

Under the Weather

I have been under the weather so haven't felt very creative the last couple of days.  I'll be back after I'm feelin' better.  Hope you have a great day.  Sun is shining and I think I could sure use some of it's vitamin D today.

Sunday, November 11, 2012

Mom's Pecan Pie


Tradition in our family for years was everyone brought something to the family Thanksgiving dinner and it was mom’s job to bring the pumpkin pie and the pecan pie.  She no longer bakes and I really miss that.  We would all gather and say “Maw, that sure looks like good pie” and we’d laugh.  Mom, it sure was good pie!

Pecan have become very expensive, but once a year we have to keep with tradition and forget about cost and calories.

1 9 inch pie shell (frozen or chilled for an hour if freshly made)
1 cups pecans, coarsely chopped
¾ cup pecan halves
2 beaten eggs
1 cup light corn syrup
¼ cup brown sugar
2 tbs. melted butter
2 tbs. flour
¼ teaspoon salt
1 teaspoon vanilla

Preheat oven to 350°F. Spread pecans along the bottom of the pie shell. Top the pecans with the pecan halves.  Mix the remaining ingredients and pour over pecans. The pecans will rise to the surface of the pie.

Bake at 350°F for 40 to 45 minutes until the filling has set. About 20 minutes into the cooking you may want to use a pie crust protector, or tent the edges of the pie crust with aluminum foil to prevent the pie crust edges from burning.

Remove from oven and let cool completely.

Mom always made her own pie crust, but I think the frozen ones are as good as anything I can make, so I use frozen.  Her recipe was lard, flour and a little bit of ice water.  Use your favorite recipe or make it easy and buy a store bought crust.

Be happy and may God bless you and yours.  

Saturday, November 10, 2012

Chocolate Pie


At Thanksgiving, we always had a large assortment of pies and desserts for the large gathering.  We ate all day and had several dessert as the afternoon passed.  There was never any left over chocolate pie. You needed to get it early or you did not get any.  You always need at least one chocolate dessert for Thanksgiving.

Filling

4 tbs. of cocoa
1 cup of sugar
5 tbs. of flour
¼ tsp. salt
1 ½ cups of milk
½ tsp. of vanilla
3 beaten egg yolks

Meringue

3 egg whites
¼ tps. cream of tartar
4 tablespoons of sugar

Your favorite pie crust (make it easy and buy a frozen pie crust)

Mix your sugar, flour, salt, cocoa, eggs and milk (all except vanilla) with a whisk.

Cook while stirring on medium until it bubbles and thickens (about five to 10 minutes). If it becomes lumpy, put through a strainer. (It will not get any thicker in the oven so cook until it's as thick as you want it.)

Remove from heat and stir in your vanilla and butter. Meanwhile, poke holes in your pie crust with a fork and bake it at 350 degrees F. until it’s brown (about 20 minutes).

Beat your egg whites with salt and when they start to get fluffy add the sugar. Pour the chocolate custard into the baked pie shell and top with the beaten egg whites. Bake it until it the peaks on the meringue are lightly browned, about 10 minutes.  Do not walk away.  Watch it closely.

Variation –  You may replace the meringue with whipped cream if you like and shave chocolate on the top to decorate or top with miniature chocolate chips.  Once you have added the chocolate pudding to the baked crust, let it cool fully and top with the whipped cream and chocolate.

Stay sweet, be happy and may God bless you and yours.  

Friday, November 9, 2012

Skillet Glazed Sweet Potatoes


This is a very simple dish for the sweet potato lovers in your group.  My mom says you have to have sweet potatoes at Thanksgiving.  It is an unwritten law. She loves them just baked like a baked potato with butter.  She picks some up every couple of weeks during the cold months.
 
This recipes dresses them up a little more for company.

1/2 cup sugar (you may use brown sugar if you like)
1/3 cup water
1 tablespoon butter
1/4 teaspoon salt
3 medium sweet potatoes, cooked, peeled, and sliced thin

Boil the sweet potatoes in their jackets until they are nice and tender, for about 25 minutes.  Let cool, then peel and cut into 1/2 inch thick slices. 

In a heavy skillet, combine sugar, water, butter, and salt. Simmer for 5 minutes. Add sliced sweet potatoes. Simmer for 10 minutes, turning frequently until the sweet potatoes are well glazed.  Serves 4.

Variation – You may add a sprig of thyme and some orange slices or pineapple slices if you want to take it to another level.  

Keep it sweet, be happy and may God bless you and yours.

Thanksgiving Menu and Memories


Every family has its own Thanksgiving traditions and standard Thanksgiving menu.  This was ours for many years:


With extended family growing, they are now creating their own traditions. Life continues to change our family also.  We lost our sister Tony this year to cancer and I’ll miss what she always brought to our Thanksgiving.  I’ll miss her Tony’s Tators and her baked beans.  Most of all, I’ll miss her laugh and huge personality.   Her warm spirit and memories will still be a part of all of my future Thanksgivings and will always be a part of my heart.  So with change comes new traditions, but I can still carry with me the wonderful memories.

So today I thought I’d share some of our Thanksgivings gone by standard menus.  I have shared many of the recipes already with you in my blog and will continue to share more.  If there is anything special you would like, please let me know.  I’d be happy to share it. 

The invitation always read noon. Yes, we sent out invitations with RSVP on them, but very few ever RSVPed, they just showed up or not.

Everyone brought their special dishes.  We were outraged if they did not bring what they had brought for years or they did not come bringing their special dish.  Everyone was told to be there at noon and they arrived very hungry, so I always had appetizers ready to start snacking on.  Two huge buffets were always set up, one for desserts and one for dinner.  Mom always made several pies for the occasion and we’d all say over and over again “Maw, that sure looks like good pie!”  We never tired of the ol’ tease.   Dion or Eddie carved the turkey and we would all hover over it to see if we could steal part of the gizzard or liver.  There were so many of us (when my house was full of foster kids we would number over 30), that we could not all sit at the tables set up, so everyone scattered throughout the house and found a chair to their liking.  The men would sit in the living room so they could watch the game. The kids went through the line first, then the adults filling their plates with two meats, two potato dishes, and all the trimmings.  The group always went back for seconds. No one counted calories or watched diets on Thanksgiving and their was always plenty.

When the day was over and it was time to go, if there were any leftovers, people would get baggies and left over containers and take home what ever they could grab.  It became a tradition to get to the leftovers early and get what you could and hide it so you got your fair share.  Dion always made dozens and dozens of rolls so we could take home his wonderful rolls.  

I can hear the noise now and see the mess left, but after everyone was gone, I missed it and was so thankful for having it in my home.  Big old houses were meant for just such occasions. 

I’ve shared many of the recipes already with you.  I’ll note what I shared already in case you wish to refer back to them.  I’ll also share a few more recipes in the next week before Thanksgiving. 

Turkey – I just shared it this week
Mashed potatoes and gravy – I shared the gravy with my turkey blog and I’ll share our mashed potatoes in a future blog.
Tony’s Tators -  I’ll share this soon
Dion’s smoked pork – He won’t share his secret bread and pork recipe, so you’ll have to come up with your own.  I did share a great recipe for Texas Road House biscuits and they would be great for Thanksgiving.
Tony’s baked beans – I’ll share
Sausage and sage dressing – I’ve shared oyster and a sweet dressing.  I’ll share mom’s  sausage dressing yet.
Cranberry fluff – I shared this week
Sweet potatoes – I’ll share
Green bean casserole – I’ll share 
Pie’s – I’ll share
Charmayne’s pumpkin bars – I shared in an October blog
Cranberry compote – I’ll share
Cherry dessert – I shared this week

The family is scattering further and further away and each of my siblings have their own extended family Thanksgiving now.  I now go to my son’s and we have established new traditions which are very special because my grandsons are part of those traditions.  I still treasure the many years I held Thanksgiving at my home though and thank God for those memories and special moments, but look forward to future Thanksgivings with my growing immediate family.

I hope your Thanksgiving is filled with much love, lots of tradition, and great memories.  Be happy and may God bless you.  

Thursday, November 8, 2012

Sweet Sausage Dressing


Wow, I sure got a lot of hits on my turkey-in-a-bag.  Don't know that I have ever got so many people looking at my blog in a day.  I love easy and simple things and after doing it for over 25 years, it must be easy or I would not keep doing it.

Thought I would share a sweet dressing with you to pair with your Thanksgiving turkey.  Your guests can pick a traditional one or a sweet one or both.  This would go great with a pork roast also.

16 slices of dried out white or wheat sandwich bread
1 lb. sausage
1 and 1/2 apples, cored and chopped
1 finely chopped onion
5 oz. bag of craisins
1 cup coarse chopped walnuts or pecans
3 teaspoons pumpkin pie spice
3 teaspoons sage
2 teaspoons nutmeg
2 teaspoons garlic powder
Salt and pepper to taste
Chicken stock
1/4 honey

Cube the bread, crusts and all, into 1 inch pieces. Add to bowl. Fry up the sausage until completely done, along with the chopped apples and onion. When sausage is cooked through, pour this mixture over the bread and mix well with a wooden spoon. Add craisins and nuts, mixing well after each addition. Combine all of the spices and sprinkle over the stuffing, mixing well to insure the spices are distributed evenly. As you’re mixing, add a little chicken stock (1/4 cup at a time) to the stuffing, being careful not to add too much. You want the stuffing moist, not sticky and gloppy.  Sample taste it. Adjust spices if necessary. If you feel the stuffing could be a little sweeter, add 1/4 cup of honey. If you accidentally add too much stock add additional bread to soak up the excess moisture. Bake at 350 degrees F. just until heated through.

Variation - You can substitute some of the bread with corn bread if you like.

An ideal Thanksgiving will still have my mother's traditional sausage and sage dressing and an oyster dressing on the table.  A small spoonful of each will work for me.

Be happy and may God bless you and yours. 

Wednesday, November 7, 2012

Frozen Turkey in a Bag


You may think me mad, but I have made my frozen turkey in a bag for over 25 years.  While everyone else is slaving over an oven, I'm still in bed and not worrying about my Thanksgiving turkey.  The process of unthawing a turkey and basting it for hours is not the only way to go.  I don't even know where I got the idea any more, but it has worked for me.  You might want to try this and break all the rules.

I used to have well over 20 to 25 people for Thanksgiving each year so needed a very large bird so I could have left overs.  I would look for a 25 pound turkey (getting very hard to find) which normally meant you had to have room in your refrigerator to unthaw a bird for days and then had to get up very early in the morning to start it so it would be done for a noon meal.  There is no brining to make it moist because the bag keeps it moist.  Now I ask the grocery store for a paper bag when I buy the turkey and the night before Thanksgiving, before I go to bed, I take my frozen turkey, rub it with salt and pepper and put it in the bag, sealing the bag by making sure the bag is tucked under the turkey and air tight.  I put it in the oven at 250 degrees F. to cook it low and slow and go to bed (around 10 or 11 PM).  I wake to the smell of turkey.  The bag soaks up the juices and bastes the turkey and it becomes golden brown with me doing nothing else to it.  How long it needs to cook depends on the size of the turkey.  It usually is golden brown before noon and so tender it is falling off the bone.

Since it was frozen, I had to leave the gizzard and liver in the turkey.  Who ever carves the turkey gets to eat them.  We fight over who gets them.

With rules now saying you can't stuff a bird, using a baster I take juices from the pan (there is an awful lot of it) and use it for gravy and for the stuffing.  I save any that is left over because it is wonderful demi glace for turkey left overs.

My gravy is about 2 cups of demi glace and 4 cups of potato water.  We make a huge pan of boiled potatoes for mashed potatoes and do not let the flavor or nutrients from the potatoes go to waste.  Taste and see if it needs salt or pepper and season.  Thicken it with a slurry of corn starch.

Try a turkey-in-a-bag and see if you don't get a golden, crispy skinned bird that is as moist as can be using a paper bag. It is so super simple anyone can do it.  Make sure the shelf in the oven is set as low as possible in the oven to allow for hot air flow around the bird. Also make sure the breast side is up when putting it in the bag.  For easy clean up, I buy one of those throw away aluminum pans with the deep grooves in the bottom. For food safety, the internal temperature of the turkey should be at 165° F. when you take it out of the oven.

Oh I can smell the turkey now.  Be happy and may God bless you and yours.


Tuesday, November 6, 2012

Cranberry Fluff Salad


This has been a staple at most of our Thanksgivings dinners.  I have played with it and added the cherries.  It goes perfect with the turkey dinner.

1 bag of fresh cranberries
1/2 cup sugar
2 red apples
1/2 cup walnuts
2 cups miniature marshmallows
8 oz. whipped topping
1 cup grapes and/or 1 cup Marciano cherries

Chop the cranberries in a food processor until they are finely chopped.  Add the sugar, cover and let set over night in the refrigerator. 

Cut up the apples in small pieces and add to cranberries.  Add chopped walnuts and marshmallows.  Mix with your favorite whipped topping. 

Variations:  You can add 2 stalks of celery in place of the cherries. This is also great in your Christmas dinner menu and the green makes it more festive. 

Be happy and may God bless you and yours.  

Monday, November 5, 2012

No Bake Cherry Dessert


This was brought to many a family Thanksgivings by my brother Dion and his wife and we all loved it.  The first one is their recipe.  I’ll share 3 very similar no bake cherry desserts with you also.  You can pick which one sounds the best. 

Crust:
2 cups graham crackers, rolled fine
2 tsp. sugar
1/2 cup melted butter

Filling
1  8 oz pkg. cream cheese
1/2 cup powdered sugar
2 envelopes Dream Whip (Need to use boxed Dream Whip)
1 cup whole milk

2 cans cherry pie filling 

Make crust by mixing crackers, butter and sugar and pat into pan or you can buy store bought crust to save the work.

For the filling mix cream cheese and powdered sugar together.  Beat Dream Whip with milk and add cheese mixture and beat with Dream Whip.  Pour over crust and cover with cherries.  Refrigerate. 

Variation - I have used marshmallow in a jar in place of the Dream Whip and it worked out well.  You only need the marshmallow and the cream cheese.  Nothing else for the filling.

Or here are another variations of the cream cheese filling.

2  8 oz.  pkg. cream cheese
3 Tbs. milk
1 1/2 cups powdered sugar
1 tsp vanilla
2 Tbs. sugar
1 cup  Cool Whip Whipped Topping
1 can cherry pie filling
1/2 tsp vanilla

Or

1 pkg. Philadelphia Cream Cheese
1 Can Eagle Brand Milk
1/3 cup Lemon Juice
1 tsp.Vanilla
1 Can cherry pie filling
1 9" prepared graham cracker crust

Beat cream cheese until fluffy.  Gradually add Eagle Brand Milk.  Blend thoroughly.  Stir in lemon juice and vanilla.

Pour into prepared crust and chill 3 hours.  Top with desired amount of cherry pie filling.

I always like choices and if I can use something I already have I often wing it.  You can pick the cream cheese filling that sounds the best to you and the topping also.  Strawberry or blueberry  pie filling would be good also.

You can also make them in cupcake papers and have individual servings.  Because of the color, they are also great for Christmas.  Try making the pie crust with chocolate crushed cookies for a chocolate crust. You are only limited by your imagination.  

Be happy and may God bless you and yours.  

Sunday, November 4, 2012

Chicken Pizza Meatballs


Do you need to take a meat dish to a function? Try this easy one.  You may also freeze them and keep for that lazy day you want to just toss something quick into the oven.  This recipe makes 12 large meatballs.  

1 1/4 pounds ground chicken
1/2 cup breadcrumbs (you may use Italian if you like)
1 teaspoons of onion powder
1 tablespoon chopped parsley
1/2 cup grated Parmesan
Salt and pepper to taste
1 minced garlic clove
1 tablespoon of chopped pimentos (Optional)
1 teaspoon fennel seeds
1 egg

3 tablespoons olive oil
1 14 ounce can of your favorite store bought pizza sauce (or make your own)
4 ounces fresh mozzarella

Preheat oven to 400° F, setting rack to upper third part of oven. In a large bowl, using your hands, gently mix together first 10 ingredients. Shape into golf size balls and place a few inches from each other on a foil lined baking sheet. In a small bowl, mix one spoonful of your pizza sauce with olive oil. Brush this mixture on top of each meatball. Bake for 15 minutes.

Remove meatballs from oven, spoon some sauce on top of each meatball, and cover each with a slice of mozzarella cheese. Broil another 3 to 5 minutes until cheese is bubbly and golden.  Heat the remaining sauce in a small saucepan and serve them with a dollop of sauce on the plate for dipping.

Variation - You can use ground turkey or ground if you like.

With Thanksgiving getting close, I think I will focus on some Thanksgiving recipes in my blog for the next couple of week that are tradition to my family and maybe some new ones for the great feast.

Have a great Sunday.  Be happy and may God bless you and yours.  

Saturday, November 3, 2012

Breakfast Tortilla Wraps or Crock Pot Breakfast Casserole


1 package frozen hash browns (unthawed)
2 packages fully cooked refrigerated pork sausage breakfast links, sliced into ½ inch pieces
1 1/2 cups shredded cheddar cheese
12 eggs
1 ¼ cup milk
2 teaspoons chili powder
2 teaspoons salt
½ teaspoon black pepper
8 ounce jar of your favorite salsa

Place unopened bag of frozen hash browns on a work surface and press on bag to loosen potato pieces and eliminating any large chunks.

Scatter 1/3 of the frozen potatoes into a 6 quart slow cooker.  In order, top with 1/3 of the sliced sausage, and 1/3 of the cheese.  Repeat to make 3 layers, starting with potatoes and ending with cheese.

Whisk eggs in a large mixing bowl.  Add milk, chili powder, salsa, salt, and pepper, and whisk to blend well. Slowly pour milk mixture evenly over top of potato mixture, allowing it to soak in.

Set crock pot temperature to low and cook for 6 to 7 hours, or until the sausage is golden brown and mixture is set, but still creamy.

Warm a package of flour tortilla shells for a minute in the microwave and put under a clean dish towel to keep warm.  You can serve on a buffet and let people make their own or make the wraps and serve them.  You may put extra toppings out if people want to add more cheese or salsa. 


If you do not want to wait all day for the crock pot you can also bake in the oven at 350 degrees for 60 minutes.  You may also serve as a breakfast casserole and not make wraps. 

I also make one on top of the stove top that is much simpler that we call Mexican eggs.  I use a package of Chorizo sausage or make my own by adding a packet of taco seasoning to a pound of sausage and fry it up.  Drain off the grease and add 8 eggs and a package of graded cheddar cheese.  When the eggs are done, sprinkle some green onion on top of the eggs and serve them in a rolled up, warm tortilla.  Serve with a side of your favorite salsa or hot sauce.

Have a little spice in your Sunday breakfast or brunch tomorrow.  This also makes a great evening meal. 

Be happy and may God bless you and yours.  

Friday, November 2, 2012

Spicy Chicken Skewers


If you are tired of the same old chicken, try this spicy dish or appetizer.  It is sweet, hot and spicy which makes for a great Friday night chicken supper.  Serve it with fried rice (See my May, 2012 Chinese recipes for the recipe).

Recipe for approximately 32 skewers

2 or 3 large skinned & filleted chicken breasts
4 tbs. soy sauce
2 crushed garlic cloves
3 tbs. brown sugar
1 tsp. chili flakes
1 tsp. cinnamon
¼ tsp. pepper
¾ tsp. cloves

Skewerd
Vegetable oil

Sauce

2 tbsp peanut butter
1 tbs. soy sauce
2 tsp. brown sugar
Pinch of garlic powder
Pinch of chili flakes
Approximately ½ cup boiling water

Just place all the above in a saucepan, gently bring to the boil; simmer for a couple of minutes. If the sauce is really thick just add a little more hot water. Cool slightly and it's ready to go.

For the Skewers

Pre soak your skewers in water.

Cut each breast lengthwise into thin slices.  Thread each piece onto the cocktail sticks folding slightly.  In a dish mix together the rest of the ingredients, (minus the frying oil) & marinade the skewers in this for around an hour.

Pour around 1½ inches of oil in a frying pan begin to heat up to a medium heat you can test this temperature later.  You don't want the oil too hot or the chicken will burn before the inside is cooked out.  Drain the marinade from the skewers. 

Test the oil is hot enough by placing just one skewer in the pan, it should immediately start to gently bubble around the edges.  Cook in batches, turning once and don't overload the pan, they should take no more than 4 to 5 minutes, when they will be crispy on the outside and thoroughly cooked through.

Place onto paper kitchen towel if you fried them and keep warm until you've cooked them all and serve immediately with the warm sauce.  Serve with salt and pepper so everyone can season to taste.  I like mine sprinkled with salt.

Variation - You may also bake in the oven.  Place in a pre heated oven at 350 degrees.  Coat your baking dish with a cooking spray and bake until done.  Time will depend on how thinly you cut the breasts.  Turn over after 5 minutes and check if done in another 5 to 10 minutes.

You can always freeze these after you've marinated them so they're all ready for your party, and quickly fry them off after defrosting.

Hope you enjoy.  Be happy and may God bless you and yours.  

Thursday, November 1, 2012

Oysters


My family and I love oysters.  I can’t say that about all of my extended family though.  My dad loved them and I was one of the few siblings that learned to love them too.  I am not sophisticated enough though to do the raw thing.  They have to be cooked.

Fresh oysters are supposed to be available in months ending with R.  It is the first of November and oysters are now readily available so they come to mind in meal planning.   Fresh oysters are however expensive (Fareway ad today showing them at $12.99 a lb.), so the question is do you want fresh or canned.  Because I use them mostly in oyster stew and oyster dressing, it really does not matter to me if it is canned.  Canned are less expensive so I usually pick canned for easy storage and the price. 

When I used to pack lunches for Josh, I used to toss in a can of smoked oysters on occasion as a treat.  He loves them and it gave him a protein treat for his lunch.  It was a simple way of saying I love you when he opened his lunch.  But my favorites are oyster stew and oyster dressing.  Here are my simple recipes.


Oyster Stew


1 pint fresh oysters in liquor or 2 cans of whole oysters
1 quart whole milk
1/4 cup butter
Salt and pepper
Oyster crackers

Pour oysters and their liquor into a soup pan.  Bring to a slow boil over medium heat.  Cook, stirring frequently, until the edges of the oysters begin to curl.  Salt and pepper and add butter and allow the butter to melt.  Pour in the milk.  Do not let the milk boil.  Just heat it until it is hot. 

Sever with oyster crackers.

It is so simple and good.  We have a family tradition of having oyster stew on Christmas Eve and I eat it all through the winter.  I grab a can from the pantry and in a few minutes have a warm soup for lunch with left overs for tomorrow.

Oyster Dressing 


This dressing is very similar to my sausage and sage dressing.  I’d like both on the table at Thanksgiving, but I always go for the oyster dressing for myself.

2 oz. butter
6 generous cups bread cubes, crusts removed
1 finely diced onion
4 oz. canned oysters or more if you like lots of oysters
1/2 cup chicken broth
1 bay leaf
1 tbs. dried parsley
1 beaten egg
Salt and pepper to taste

Preheat oven to 350 F. Spread bread cubes on a flat baking sheet and toast for five minutes on each side.

Drain the canned oysters, rinse and pat oysters dry.  Chop oysters into ½” pieces.

In a large skillet, melt butter on medium heat. Add in diced onion and sauté until soft and translucent.

Add chicken stock and bay leaf to onions and continue to simmer for 10 minutes until broth has started reducing. Add chopped oysters to skillet during the last five minutes, stirring once to ensure even cooking.

Remove bay leaf from skillet. In large bowl, combine oyster broth mix to toasted bread crumbs. Stir dried parsley, salt and black pepper. Add in beaten egg and still well until thoroughly coated.

Pour into a 9 x 9 inch baking dish, cover and bake for 30 minutes. Remove the cover and bake an additional 10 to 15 minutes until the top begins to brown and become crisp.

I have the canned oysters on my weekly shopping list so I’ll pick them up tomorrow.  I think I’ll be having oyster stew for lunch one day next week. 

Be happy and may God bless you and yours.


Wednesday, October 31, 2012

Chinese Orange Chicken


Orange chicken is one of my favorite Chinese dishes.  Here is a super simple crock pot recipe that is so easy.  Start it in the morning and walk away until lunch or dinner (AKA supper).

3 to 4 boneless chicken breasts
1/3 cup flour
Olive oil
1/2 tsp. salt
1 tsp. of your favorite balsamic vinegar
3 tbs. ketchup
6 oz frozen orange juice concentrate (thawed or put in the microwave for 45 seconds)
4 tbs. brown sugar
Green onion

Cut your chicken breasts into about 1 inch pieces.  Coat your chicken in flour and cover each piece well shaking off any extra flour.  Pour a small amount of oil in a hot skillet and brown the chicken (medium heat). Do not over crowd the pan because it does not allow it to brown. The chicken doesn't need to be fully cooked since it is going in the crock pot.  After the chicken is done cooking, pour the pieces into the crock pot.  I like to lightly spray my crock pot with a little Pam first for easy clean up.

In a bowl, mix the orange juice, brown sugar, vinegar, salt, and ketchup.    Pour the sauce over the chicken and give the pot a stir.

Cook on low 5 to 6 hours or high 2 to 3 hours.

You do not need to fix it in the crock pot if you'd rather fix it on top of the stove.  You can put it in a covered baking dish and put it into the oven until it is done.  Heat oven to 350 degrees and bake for 30 minutes or until the chicken is tender and done.

Serve with white rice and garnish with chopped green onion.

Hope you have a fun Halloween.  Be happy and may God bless you and yours.  

Tuesday, October 30, 2012

Canned Sweet Potatoes


At book club last Friday, I had a very simple sweet potato dish that I can say was the best I ever had.  It was made with white sugar and the potatoes were sliced very thinly.  We had a pork tenderloin roast and a mandarin orange salad that made for a beautiful fall meal.   I normally don’t like sweet potatoes when they are served with brown sugar or marshmallows, but I really like these.  I’m sharing a recipe similar to my apple-pie-in-a-jar recipe, so you can simply heat it and serve it at your will or use it for other recipes like sweet potato pie.  I can’t always find sweet potatoes here in Maquoketa, but am seeing them now so my mind went to canning them in a white syrup.

18 lbs peeled sweet potatoes steamed until just cooked through.
6 cups white or brown sugar (your choice)
10 cups water
2 teaspoons cinnamon
1 tsp salt

18 lbs of sweet potatoes will yield 7 or 8 quarts, canned.

Cook the potatoes and cube them up into 1 or 2 inch cubes. Don't mash them up too much, or the results will be mushy.

Add the water, sugar, cinnamon and salt to a pot and bring the syrup to a rolling boil.

Fill quart jars with the sweet potatoes and cover with the hot syrup, leaving 1 inch of "head space" between the top of the potatoes and the top of the jar.

Put sterile lids on the jars and seal.

Process for 60 minutes in a hot water bath.

Stay sweet and happy.  May God bless you and yours.  

Monday, October 29, 2012

Norwegian Apple Cake


I've been busy the last couple of days so have neglected sharing any recipes.  I usually do this early each morning and just getting around to it here at 5:00 PM, but better late than never.  I like to try recipes from other countries and I love apples, so I thought I'd share this Norwegian recipe with you.  

1 Egg
2 Tbs. milk
3/4 Cup sugar
1 Tsp. vanilla extract
1 Tsp. baking powder
1/3 Tsp. salt
1 Tsp. ground cinnamon
1/2 Cup + 3 Tbs. flour
1/2 Chopped almonds or walnuts 
3 Medium sized tart apples


Preheat the oven to 350° F, line a  springform cake pan with baking paper and then butter it.

Peal, core, and dice the apples.

Stir all the ingredients together (the mixture will be thick similar to that of muffins).  Spread into the pan.

Bake for 50-60 minutes, or until browned (check when you first start smelling it).  Insert a toothpick in the center to see if it comes out clean.

Cool for 1 minutes, run  a knife along the side of cake to loosen and remove from the side of springform pan.

Place a cooling rack upside down. Turn rack and cake over. Remove the bottom as well as the baking paper of the springform pan. Place back on the rack and cool.

Cut into wedges and serve with either sweetened whipped cream or ice cream.

Will make a great dessert for one of these cold fall evenings.  

Be happy, stay safe and may God bless you and yours. 

Friday, October 26, 2012

Dairy Free Veggie Dip


I played in the kitchen yesterday developing a dairy free veggie dip that my grandson can have since his diet is dairy free and gluten free.  I think I came up with something I like.  Hope he does too.

1 cup of your favorite Mayo
1 tsp. Balsamic vinegar
1 tsp. onion powder
½ tsp. garlic powder
1 large tablespoon of chopped chives
1 large tablespoon of chopped parley
Pinch of salt
1 tsp. dried dill weed (not seed)

I chopped some of the last of my parsley and chives I harvested from my garden yesterday.  I think the frost will take it with temps getting down into the 20’s starting tonight.

Mix your mayonnaise and chopped chives and parley.  Add a bit of your favorite Balsamic vinegar to give it a bite.  If you don’t have Balsamic vinegar, then squeeze a half a lemon into it.  Add your onion and garlic powder and stir very well.  Add a pinch of salt and your dill weed and finish mixing until well blended.  Refrigerate and let flavors marry for a while.

It should store just like mayonnaise in your refrigerator.  I put it in a pint sized mason jar. 

Variations - You can play with it and add your tastes.  You could add mustard or a dash of hot sauce to give it an even bigger kick.  You can also use it as a flavored mayo on your sandwiches. 

I love to invent in the kitchen.  It makes me happy.  Do what makes you happy and may God bless you and yours.

Thursday, October 25, 2012

Enchiladas


This recipe does make a lot.  I will use a third and freeze the rest for later.  Put in 2 baggies to freeze for 2 more meals.   1/3 will make about 10 enchiladas.

4 cups of chicken broth, low sodium
2 cups of water
2 cans (15 oz.) tomato sauce
3 tablespoons corn starch
1 tsp. cocoa powder
2 tsp. minced garlic
1 tsp. oregano
1 tsp. cumin
2 tsp. onion powder
6 dashes of your favorite hot sauce (optional or cut down to cut heat)


In a large pot on medium heat, add the chicken broth, water and 1 1/2 cans of tomato sauce.

While this is starting to get warm, take the remaining tomato sauce and add this to a small bowl. Add the remaining ingredients and blend well.  Slowly add this to your pot.

Once your pot reaches a boiling point, it should start to thicken slightly. Turn your heat down to medium low and let simmer.

Let the sauce simmer for about an hour to marry the flavors.  You need to stir it about once every 15 minutes.  


Filling the enchilada is a matter of choice.  I like to fill them with a mixture of both chicken and hamburger.  You can make just chicken or just beef if you like or a pan of each. To season the meat I simply add salsa because it already has your onion, garlic, and other seasonings in it.  Cut up 2 chicken breasts into small pieces and fry them with a pound of 85% lean hamburger.  Fry your meat until done and add about a cup of your favorite salsa.  I like medium heat, but you can use mild or hot.

Spray your baking dish with oil and coat the bottom with just enough enchilada sauce  so that it covers the bottom of the dish.

Add Mexican blend grated cheeses or what ever your might have in the house.  Monterey Jack or Cheddar works fine.  Roll up the tortilla (I use corn tortillas but you can also use flour making them gluten free).  You may wish to stick them in the microwave a few seconds before you fill them so they become more pliable and they do not crack when you roll them.  I put a pile of them in and heat for 30 seconds.  Once filled, place the enchilada  face down in the dish so it does not open.  Pour your enchilada sauce over the enchiladas until each one is coated.  Sprinkle more cheese over the top of the enchiladas. 

Preheat oven to 350 degrees.  Bake the enchilada's for 25 to 30 minutes.  Everything is precooked, so you only need enough time to melt the cheese until it is bubbly and starting to brown and to warm the enchiladas. You can also freeze the enchiladas by double wrapping them in aluminum foil and just thaw and heat up for another meal.

Suppose to rain today and our nights are going to start bringing us frost.  That means hot meals on the table time.  This is a great family pleaser.

Be happy and may God bless you and yours.

Wednesday, October 24, 2012

Condensed Cream Soup Mix


Yesterday I reached for cream of mushroom soup for a recipe and I was out.  I always seem to be out of it or cream of chicken soup.  I found this idea and now I will not be out of it again.  I made some changes because the original called for Italian herbs and dried onion flakes.  I wanted it creamier and unseasoned not knowing what I would be putting it into.  You again can play with it how ever you like. It is easier to add the flavor accordingly once you have reconstituted it.

This is a great money saving idea and a simple solution to stocking creamed soup stock for your pantry to make winter soups or casseroles.

For each batch, you’ll need 2 quart jars to store. It’ll store on the pantry shelf up to a year.

4 cups instant non-fat dry milk
1/2 cup of dairy creamer
1 cup cornstarch
1/2 cup chicken bouillon  
2 teaspoons onion powder
1 teaspoon garlic powder
1 teaspoon white pepper


This equals 18 cans of condensed cream of chicken!  Just think of the storage space you save.

To reconstitute (equal to one 10 ounce can of condensed cream soup) the soup, combine 1/3 cup of the mix and 1 1/4 cups water.  In a small saucepan on the stove or a microwave safe bowl; cook and stir till mixture thickens.

Label the jars and note the above directions to reconstitute the mix right on the lid. Once you have reconstituted the soup, add you chicken, mushrooms, cheese, broccoli or what ever you wish to make the cream soup of your choice.

Note:  I used 1 2 quart jar so I could mix all of the ingredients in it by shaking well.  Shaves a mess and extra dish washing.

I love choices, don't you?  Be happy and may God bless you and yours.

Tuesday, October 23, 2012

Spicy Teas


Do you want to goose up your apple cider?  Try this warm recipe.

Spicy Apple Tea
             
Pour this spicy brew into a crock pot and keep warm to serve warm to family or guests.

1 (32 oz.) bottle apple cider
5 c. water
1/4 c. honey
2 tsp. pumpkin pie spice
3 family size tea bags

Combine first 4 ingredients in a large pan. Bring to a boil; remove from heat. Add tea bags; cover and let stand 4 minutes. Discard tea bags. Place over low heat; simmer, uncovered, 30 minutes. Serve warm. Yield: 3 3/4 quarts (about 71 calories per 3/4 cup).

Serve with a cinnamon stick in the cup of cider. 

Pumpkin Tea

This is a recipe to make your own pumpkin tea.  You will need to play with it to adjust to your liking.  The longer you steep the spices the spicier it will be. 

Pinch of Allspice
Cinnamon Chips
Grated Nutmeg
Whole Clove
Touch of Shaved Ginger Root
Touch of Orange Zest

Make a tea bag out of cheese cloth and tie with cotton string to steep the spices in your tea pot. 

Pumpkin Flavoring:

If you choose to have the flavor of actual pumpkin in your Pumpkin Spice Tea, and not just the spices alone, add pumpkin flavor from a teaspoon full of pumpkin butter.  I’ve given you a recipe below.  

If you just want spice tea flavor add the spices to a nice black tea or tea of your choice.  Look at some of your Celestial fruit teas like apple, orange or peach.  You may wish to add vanilla or honey to flavor. 

Pumpkin Pie Spice Recipe

If you have a recipe that calls for pumpkin pie spice, you do not need to buy it.  You can make your own by using spices you have in your pantry already.  Use these measurements for a teaspoon of pumpkin pie spice.


This recipe makes just over a teaspoon of pumpkin spice blend. If you need more, simply double or triple the recipe.

1/2 Teaspoon Cinnamon
1/4 Teaspoon Ginger
1/4 Teaspoon Allspice
1/8 Teaspoon Nutmeg

Carefully measure four ingredients and stir together.

This spice blend may be mixed in advance and stored in an airtight container.


Pumpkin Butter


1 can (15 ounces) Pumpkin
2/3 cup packed brown sugar
1/4 cup honey
1 tablespoon lemon juice
1/4 teaspoon ground cinnamon
1/8 teaspoon ground cloves

Combine pumpkin, sugar, honey, lemon juice, cinnamon and cloves in saucepan. Bring to a boil over medium high heat; reduce heat to low. Cook, stirring frequently, for 20 to 25 minutes or until thickened. Serve with biscuits, breads and corn muffins. Store in airtight container in refrigerator for up to 2 months.  Makes 2 cups.


Monday, October 22, 2012

Pumpkin Spread


Well I lied.  I'm sharing another pumpkin recipe, but I think you will like this one.  It is a no bake recipe and you can use it as a snack or for breakfast.

While making pumpkin bread yesterday, my grandson wanted to lick the bowl.  It made me think that it would make a good spread in that I was making him cinnamon toast at the time.  So I came up with this spread after doing a search to see if someone already invented it.  They had and in fact I found that it was being sold.  I found this recipe and it really looked good.  With its cinnamon, nutmeg and maple flavoring, this really tripped my trigger.  It would be great for taking to work with bagels, dipping apple slices, on top of graham crackers, for brunch or for your Halloween party.  The idea of having it on a toasted bagel really appealed to me but it would go good on any crusty toasted bread.   I have tweaked the recipe it to my liking.  You may want to tweak it some more.  You could reduce the fat or use a sugar substitute if you like.

1 package (8 ounces) whipped cream cheese
1/2 cup canned pumpkin
1/2 cup sugar
1 teaspoon ground cinnamon
1 teaspoon vanilla extract
2 tablespoon of maple syrup
1/2 teaspoon pumpkin pie spice
1/2 teaspoon ground nutmeg
1 8 ounces frozen whipped topping

Prep work – thaw the whipped topping.  Set out the cream cheese to make sure it is soft.

In a large bowl, combine the cream cheese, pumpkin and sugar; mix well. Beat in the cinnamon, vanilla, maple syrup, pumpkin pie spice and nutmeg. Fold in the whipped topping. Refrigerate until serving.  It yields about 4 cups.

Hope you have a great Monday.  Be happy and may God bless you and yours.

Sunday, October 21, 2012

Cajun Three Fish Chowder

Here is a great soup seasoned or unseasoned for a chilly Fall Sunday.  


5 strips thick cut bacon
2 medium onions, chopped
4 large cloves garlic, minced
2 Tablespoons butter
2 Tablespoons white flour
2 cups chicken, fish or vegetable stock (I use chicken)
2 cups unpeeled and diced potatoes
1 Tablespoon fresh thyme leaves
1 pound whitefish fillets (cod or haddock hold up well )
1 pound frozen cleaned shrimp
1 pound mussels 
1 cup heavy cream
1 teaspoon Cajun seasoning
2 teaspoons curry powder
Salt and freshly ground black pepper to taste
1/4 cup minced fresh parsley

In a large, heavy Dutch oven, fry up the bacon until crisp. Drain bacon on paper towels and add the butter to the pot. Sauté the onions in the bacon drippings and butter until transparent (about 5 minutes). Add the garlic and cook for one minute. Add flour, stirring constantly for a few minutes, until the roux turns slightly golden (If you prefer corn starch make a slurry and add after the potatoes are done) Stir in the stock, potatoes and thyme and simmer until potatoes are tender (about 30 minutes on medium heat).  Stir constantly to keep the soup from burning or sticking to the bottom of the soup pot. Cut the whitefish into 1 inch chunks and add to the pot. Simmer on low for 10 minutes or until the fish is just opaque. Steam the mussels while the fish is finishing cooking and set aside (if you can’t find mussels, add a can of clams).

Turn heat down to low.  Stir in the cream and seasonings and simmer on low until just heated through, making sure not to let the soup boil (you do not want it to curdle). Ladle soup into bowls and top with steamed mussels, bacon bits and parsley.  If you are using clams to replace the mussels, you can add the entire can when you add the cream.  Honestly though, mussels are one of my most favorite foods and think they add a great deal.  Hope you can find them.

If you do not like the seasonings, leave them out and you will still have wonderful chowder.  Play with it and make it your own.

Have a super Sunday.  Be happy and may God bless you and yours.  

Saturday, October 20, 2012

Chicken with Apple Bacon Stuffing

This is a new idea for that chicken breast you don't know what to do with for supper or maybe you call it dinner.  Here in farm country many of us call the noon meal dinner.  That comes from a history of feeding a large meal at noon to hard working farmers, family and farm hands on the farm and our Sunday noon meal always being a large family sit down meal.  That leaves the evening meal to be called supper.  To this day, I can't call the noon meal lunch out of habit. What ever you call it or when you eat it, it is tasty.


2 large chicken breasts
1 cup chopped cooked bacon
1 large Granny Smith apple, remove core, chopped into small pieces
1 small white onion, chopped
½ teaspoon dried rosemary
2 tablespoons maple syrup
Extra virgin olive oil
Kosher salt and pepper

Chicken

Using a clean work surface, butterfly both chicken breasts.  Slice along the length of the chicken at an angle that leaves about a 1/2 inch thick of flesh; continue slicing through, while pulling and unrolling the inside of the chicken until you get a flat rectangle that is about 1/2 inch thick.  Season both sides with olive oil, salt, and pepper. Set aside.

Stuffing

Cover the bottom of a large skillet with extra virgin olive oil.  When hot, add bacon, onion, apples, and rosemary. Season the mixture with  salt and pepper to taste. Sauté, stirring occasionally until soft. Set aside to cool.

Preheat oven to 400 F.

Spread stuffing on chicken starting from the edge closest to you, covering the chicken entirely, leaving about 1" clear on the far edge. Roll tightly, starting from the closest edge, then secure with twine.

Arrange roll on a single layer on an oven dish. Bake the roll for 30 minutes, turning it over once at the halfway point of 15 minutes. Glaze with 2 tablespoons of Maple Syrup during cooking and brush pan drippings all over the roll for color and extra flavor.

Let the roll rest for 10 minutes before carving.  Cut off the string and slice about 1 inch thick.

Variation - The original recipe calls for chorizo sausage.  Add 1 cup of cooked chorizo in place of the bacon.  The dish will have a Mexican flare and be much spicier.  You can also use 1 cup of just good breakfast rope sausage in place of the bacon or chorizo.

We get to see the sun today and tomorrow so looking forward to the weekend.  Hope we can see the meteor shower tonight.  Be happy and may God bless you and yours.